📌 Key Takeaways
A five-minute oil drop test catches grease barrier failures before bad paper reaches your food line.
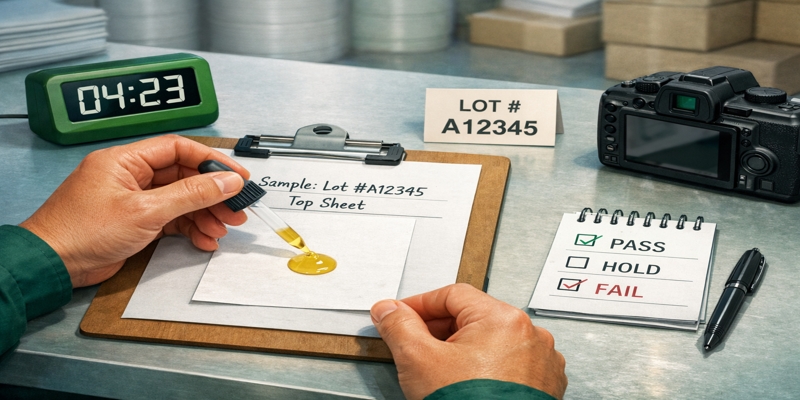
- Screen Every New Lot: Test samples from top, middle, and bottom of each delivery to catch coating problems that look identical on the surface.
- Pass, Hold, or Fail: No oil on the backside after five minutes means pass; visible wetness or halo means hold the lot and verify specs with your supplier.
- Visual Checks Miss Everything: Two sheets can look identical while one lets grease bleed through in minutes—only testing reveals the difference.
- Document for Leverage: Photos with lot codes and a simple receiving log give you evidence for supplier conversations instead of vague complaints.
- This Is Triage, Not Proof: The spot test flags obvious problems fast, but lab testing and compliance certificates still verify safety for your actual menu items.
Quick screening catches grease failures before customers do.
Food service operators and QA teams managing incoming food packaging supplies will gain a practical receiving check here, preparing them for the detailed method and troubleshooting guide that follows.
~ ~ ~ ~ ~ ~ ~ ~ ~ ~ ~ ~ ~ ~ ~ ~ ~ ~
The takeout bag looked fine when it left the line. Fifteen minutes later, a translucent oil halo spread where the fries sat, bleeding through to the counter beneath. The customer snapped a photo. The review went live before the shift ended.
Grease failures rarely announce themselves at receiving. They surface mid-service—when a liner wicks through under a hot burger, when a sandwich wrap turns see-through, when complaints pile up faster than anyone can trace which lot caused the problem. Operational costs scale rapidly through rework, credit memos, and brand erosion.
This five-minute grease spot test is a practical way to screen incoming lots of food packaging paper for obvious weak points. Think of it as a flashlight test for grease barrier performance—it can quickly reveal breakthrough, wicking, or inconsistency before a lot reaches the line. Treat it as triage: screen fast, document the result, then verify the right specs and certificates for the real use-case.
Why Grease Failures Happen—and Why a 5-Minute Screen Helps
Grease failures usually come down to two factors: mismatch and variability.
Mismatch happens when paper is used outside the conditions it was designed for. A liner that works for a warm pastry may fail under a burger that sits, steams, and presses oil into the sheet. Heat, dwell time, pressure, and fat load all change the stress on the paper.
Variability happens when two lots of the same product do not behave the same way. A shipment can arrive with weaker sizing or coating than the prior one—a risk that underscores why verifying supplier capability before awarding orders matters more than price alone. On the surface, it looks identical. In service, it behaves differently.
Grease barrier performance depends on sizing or coating treatments applied during manufacturing. When these treatments are inconsistent—whether due to production variability, storage conditions, or supplier changes—the same product grade can behave differently from lot to lot.
The problem compounds because visual inspection reveals nothing. A stack of liners looks identical whether the barrier is strong or weak. The failure only becomes visible when hot, oily food makes contact and grease begins wicking through seams and surfaces.
Lab testing provides definitive answers. Formal methods like the TAPPI T 559 kit test measure grease resistance by exposing paper to increasingly aggressive test solutions, assigning a numeric kit rating based on performance—specifications that should be clearly defined when creating your mill spec sheet. However, lab results take time and cost money—resources that receiving teams rarely have when a shipment arrives and needs to go into rotation.
A five-minute spot test fills this gap. It functions as a fast inbound screen that catches obvious breakthroughs, flags inconsistent lots, and creates documentation for supplier conversations.
What the Grease Spot Test Can and Can’t Tell You
This is a performance screen. It answers one narrow question: does this lot show early signs of oil breakthrough under a simple, standardized exposure?
Understanding the boundaries of this screening method prevents both false confidence and unnecessary alarm.
What the test can detect:
- Obvious oil breakthrough or wicking through the sheet
- Weak or inconsistent sizing and coating across samples from the same lot
- Lot-to-lot variation that visual inspection would miss
- Problem zones such as edges, folds, or areas near printing
What the test cannot prove:
- Regulatory food-contact compliance—that requires documentation such as FDA 21 CFR 176.170 declarations or ISEGA certification, which should be verified through structured supplier audits
- Long-duration performance under sustained heat, pressure, or extended contact time
- How the paper will behave with higher-fat foods than the test oil represents
Two common misconceptions deserve attention. First, “food-safe” does not automatically mean “greaseproof,” though the two are increasingly linked. Food-contact compliance (e.g., FDA or BfR standards) dictates which chemicals can be used to treat the paper, while grease resistance measures how well those treatments perform. While separate properties, they intersect heavily in modern manufacturing—specifically regarding the restriction of certain fluorochemistries (PFAS) used to achieve high grease resistance.^1
Buyers must ensure that the chemical barrier mechanism chosen for performance remains compliant with evolving regional safety standards. Second, higher GSM does not guarantee better grease resistance. A thicker sheet with weak sizing can fail faster than a thinner sheet with proper barrier treatment. Grease resistance is heavily influenced by the barrier system—a lower-GSM sheet with a stronger barrier treatment can outperform a heavier untreated sheet.
Key definitions for reference:
- Grease resistance: How well paper prevents oil from wicking through or staining the surface. A good overview of how this property is tested and described is outlined in Smithers’ grease resistance testing overview.
- GSM: Grams per square meter—a measure of paper weight, not barrier performance (for a detailed breakdown of how GSM and kit levels interact in food packaging paper, see our operator’s guide)
- Kit rating: A numeric score (typically 1–12) assigned by formal test methods like TAPPI T 559, indicating resistance to progressively aggressive grease-testing solutions; higher numbers indicate greater resistance
What You Need (and What to Standardize)
Consistency makes results comparable over time. Changing the oil type, drop size, or wait time between tests undermines any meaningful comparison between lots or suppliers.
Materials:
- Cooking oil (vegetable or canola—select one and use it consistently)
- A dropper or pipette for uniform drop size
- A flat, clean surface such as a clipboard or cutting board
- A timer
- Sample sheets from the lot being tested
- A camera or phone for documentation
- A marker for labeling
- The receiving log template provided below
Sampling approach:
Pull sheets from multiple points in the stack or roll—top, middle, and bottom positions. Grease resistance can vary within a single lot if coating was applied unevenly during production. For rolls, sample from the outer layers, middle section, and near the core. Testing three to five sheets from different positions provides a more representative assessment than testing a single sample. If results look borderline, test two additional sheets before deciding.
Handle all samples by the edges. Oils transferred from hands can contaminate the test area and produce false results.
The 5-Minute Method

The procedure is straightforward. The discipline lies in executing it identically every time.
1: Label and prepare the sample. Mark the sheet with the supplier, product or grade, and lot or roll ID—keep the label away from the test area to avoid interfering with results. Place the sheet flat on the clean surface with the food-contact side facing up. If the paper is printed, the printed side typically faces away from food, so test the unprinted side as your primary surface.
2: Apply the oil. Using a standard laboratory dropper or pipette, apply a consistent volume of oil (typically one drop, or approx 0.05 mL) to the test area. Consistency is more critical than exact volume; ensure the same dropper is used for all comparable tests to maintain a uniform challenge to the paper surface. Avoid printed zones, embossed areas, and folds—these can produce misleading results. If actual use involves printed stock, test both printed and unprinted areas separately and note the difference.
3: Start the timer. Set it for five minutes. Do not touch or move the sample during this period.
4: Inspect the backside. After five minutes, flip the sheet and examine the area directly beneath the oil application point. Look for visible translucency or darkening, oil that has wicked beyond the original drop boundary, and any wet feel on the reverse surface.
5 (optional): Blot test. Press a clean, dry sheet of white paper beneath the test area and lift it away. Check for any oil transfer. This step catches subtle breakthroughs that may not be visible to the eye alone.
6: Record the result. Log the outcome using the rubric below and photograph both sides of the sample with the lot code visible.
How to Score Results: Pass, Hold, or Fail

A three-tier rubric keeps decisions consistent across shifts and team members.
Pass: No visible oil breakthrough or wetness on the backside after five minutes. While a slight darkening (wetting) of the fibers may occur on the top surface of thinner sheets, the reverse side must remain dry to the touch. The blot test must show zero oil transfer. This lot can generally proceed to use for applications matching the test conditions, subject to final quality checks.
Hold: Light halo visible, or results vary across samples from the same lot (some pass, some show slight penetration). Do not deploy this lot for high-fat or high-heat items until the specification has been verified with the supplier. The lot may be acceptable for lower-risk applications.
Fail: Clear translucency or wet feel on the backside. Oil has wicked beyond the original drop boundary. Blot test shows obvious transfer. Hold this lot entirely and escalate to the supplier.
A ‘Hold’ status creates a necessary buffer, allowing for spec verification before a full rejection triggers supply chain friction.
Note: ‘Pass’ status is conditional. High-fat loads (e.g., fried chicken) or extended heat lamp dwell times may still penetrate barriers that pass a room-temperature oil test. Fried chicken generates more grease load than a croissant. A burger held in a warming drawer for twenty minutes stresses paper differently than one served immediately. Match the barrier level to the food’s fat load and expected contact time—and confirm the relevant grease resistance rating or kit rating with the supplier for intended menu items. Our integrated safety model provides a strategic playbook for aligning these specifications with verification protocols.
What to Do If a Lot Fails (and What to Ask the Supplier)
A failed spot test provides documentation, not just a problem. It gives specific evidence for supplier conversations rather than a vague complaint about quality.
Immediate actions:
- Segregate the lot and do not deploy it for any food-contact use until the issue is resolved
- Retain tested samples and several untested sheets for reference and potential third-party verification
- Photograph test results with lot codes clearly visible
Information to request from the supplier:
- GSM confirmation: What is the actual basis weight of this specific lot?
- Grease resistance rating or kit rating: If available, what is the tested grease resistance level per methods like TAPPI T 559?
- Coating or sizing details: What barrier treatment was applied, and did anything change versus the prior lot?
- Lot-specific Certificate of Analysis (COA): Does documentation exist for this particular lot’s test results?
- Food-contact compliance documentation: Can the supplier provide FDA declarations, ISEGA certificates, or equivalent documentation for the relevant market? A structured approach to verifying food contact compliance beyond certificates helps ensure these documents remain meaningful.
This forensic approach forces alignment between procurement specs and physical reality. Documentation matters, but it solves a different problem than performance screening. Supplier certificates and management system credentials can be useful signals, yet they do not replace a product-specific performance specification. A short explainer on what common certifications do and do not indicate is covered in understanding fake versus real FSC, PEFC, and ISO certificates. For broader context on verifying supplier certifications and understanding their scope, see certificate scope explained: how to spot out-of-scope FSC/PEFC claims.
Turn It into a Repeatable Receiving Check
A single spot test catches one bad lot. A routine catches patterns and creates accountability.
Printable Grease Spot Receiving Log
| Date | Supplier | Product / Grade | Lot / Roll ID | GSM (if known) | Oil used | Result (Pass / Hold / Fail) | Photo saved? | Action taken | Notes |
Keep results comparable: Use the same oil, similar drop size, a flat surface, and identical wait time for every test.
Building the routine:
Run the test on every new lot at receiving—before paper enters rotation. Assign ownership to one person per shift, or rotate responsibility with clear handoff procedures. Store retained samples (both tested and untested) from each lot for at least 30 days in case disputes arise later.
Review the log weekly. Look for patterns by supplier and by lot: Is one supplier showing more holds than others? Does a particular product grade produce inconsistent results? Are failures clustering around certain production date ranges?
Escalation rule: If a supplier delivers two holds or fails in a short window, trigger a formal review. Request updated specifications, ask for COA documentation, and evaluate whether the ordered grade truly matches actual use-case requirements. This may lead to spec re-qualification—confirming that the paper grade specified is appropriate for the menu items and service conditions in play, a process outlined in our food packaging paper sourcing matrix. For guidance on structuring supplier conversations around specifications, see seven questions to ask a new supplier that scammers can’t answer.
Procurement discipline also plays a role. When suppliers quote “similar” grades with different assumptions, true comparability breaks down. A practical guide for normalizing procurement comparisons is covered in comparing quotes across Incoterms.
Common Pitfalls That Cause False Results
The spot test is only as reliable as the consistency behind it. These variables introduce noise into the data:
Oil type and temperature: Different oils have different viscosities and penetration characteristics. Switching from vegetable oil to olive oil between test runs skews comparisons. Cold oil behaves differently than room-temperature oil. Standardize both the oil type and storage conditions.
Printed or embossed areas: Ink and embossing affect how oil interacts with the paper surface. Test unprinted areas for a baseline reading, and test printed areas separately if the use-case involves printed stock. Note the difference in results.
Sample handling: Fingerprints transfer skin oils to the paper before the test begins. Handle all samples by the edges and keep the test surface clean between runs.
Inconsistent drop size: A larger drop spreads further and penetrates faster than a smaller one. Use a dropper or pipette and maintain consistent volume across all tests.
Timing drift: Checking results at four minutes versus six minutes produces different outcomes. Set a timer and adhere to the same interval every time.
Environmental variation: Humidity affects paper properties. Testing in a humid receiving dock one day and an air-conditioned office the next can produce incomparable results. Select a consistent testing location.
Single-sample decisions: A top sheet alone is not a lot to check. Pull from multiple points and test more than one sheet before deciding.
Control these variables, and the spot test becomes a reliable screening tool. Allow them to drift, and results become noise rather than signal.
A five-minute spot test does not replace laboratory grease resistance testing or food-contact compliance documentation. What it provides is a fast, repeatable method to catch obvious barrier problems before they reach customers—and the evidentiary support needed to address quality deviations with suppliers.
Prioritize rapid screening to ensure that technical specifications align with actual performance before inventory enters the production workflow.
For more practical verification frameworks and supplier qualification guides, explore the PaperIndex Academy. For buyers ready to source food packaging paper from verified suppliers, find food packaging paper suppliers on PaperIndex or submit an RFQ to receive quotes.
Disclaimer:
This article describes a quick screening check for grease barrier performance. It does not replace formal testing, supplier specifications, or food-contact compliance documentation required for your application.
Our Editorial Process:
Our expert team uses AI tools to help organize and structure our initial drafts. Every piece is then extensively rewritten, fact-checked, and enriched with first-hand insights and experiences by expert humans on our Insights Team to ensure accuracy and clarity.
About the PaperIndex Insights Team:
The PaperIndex Insights Team is our dedicated engine for synthesizing complex topics into clear, helpful guides. While our content is thoroughly reviewed for clarity and accuracy, it is for informational purposes and should not replace professional advice.