
📌 Key Takeaways
A simple oil-drop test reveals which paper samples resist grease long enough for your menu—before you commit to a full order.
- Screen Before You Specify: A five-minute oil test flags weak samples early, so you ask better questions when talking to suppliers.
- Match Test Time to Hold Time: Paper that looks fine at five minutes might fail at thirty—test for as long as food actually sits in the wrapper.
- Watch for Four Warning Signs: Spreading halos, see-through spots, soft paper, and oil on the underside all signal likely service failures.
- Consistency Beats Guesswork: Same oil, same drop size, same timing across samples—otherwise you’re comparing apples to oranges.
- Turn Observations Into Requirements: “No underside spotting at 30 minutes” is a specification suppliers can match; “greaseproof” is just a marketing word.
Screen first, specify second, surprise never.
Food service operators and procurement managers evaluating food packaging paper samples will gain a repeatable testing method here, preparing them for the detailed protocol that follows.
~ ~ ~ ~ ~ ~ ~ ~ ~ ~ ~ ~ ~ ~ ~ ~ ~ ~
Translucent wrapper. Lunch rush.
Two hours ago, that paper looked fine in the sample kit. Now it’s leaking grease onto the counter, and customers are noticing spots on the outside of their bags. The supplier called it “greaseproof.” The burger wrapper disagrees.
This gap between what a sample promises and how it performs under actual service conditions is where complaints begin. The problem often isn’t the paper itself—it’s that the grease resistance was never tested against your specific menu. Hot food, extended hold times, and the pressure of stacked containers create conditions that a visual inspection of a dry sample simply cannot predict.
A quick oil-drop test is a practical way to screen paper samples before committing to a full run, complementing a more comprehensive 5-minute grease spot test protocol at receiving. It won’t replace a certified lab method, but it can quickly reveal whether a sheet is likely to wick oil, stain, or weaken under the kind of contact time and pressure your food creates. Use it to narrow options fast—then confirm performance by specifying the grease-resistance level you actually need.
Think of this screening method like a taste test before committing to the recipe. It tells you whether the ingredient is worth considering—not whether it will perform flawlessly at scale. This guide walks through the complete method, from setup through interpretation, and shows how to translate observations into clearer specifications when talking to suppliers.
A Simple Oil-Drop Screen in Five Steps
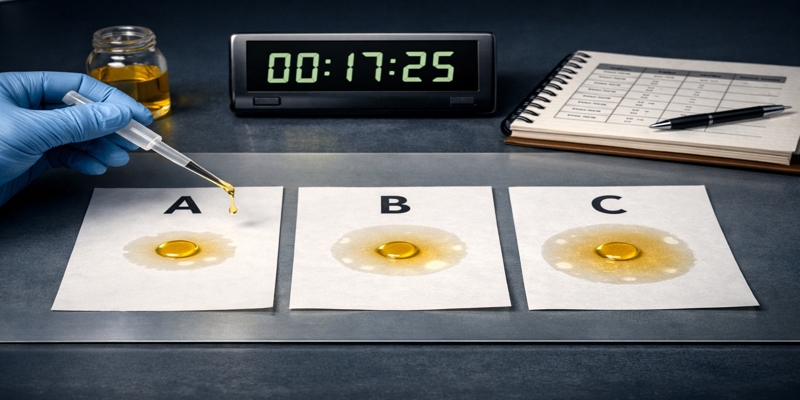
- Label each sample (A, B, C) and place the sheets flat on a clean, non-absorbent surface.
- Put one consistent drop of the same cooking oil in the same spot on each sample, then start a timer.
- Check at fixed intervals (30 seconds, 2 minutes, 5 minutes, 15 minutes, 30 minutes) for a spreading halo, translucency, softening, and underside spotting.
- Mark each sample as pass, borderline, or fail based on what happens within the contact time that matters for your menu.
- Map your findings to established grease-resistance standards (such as Kit Levels) to facilitate objective communication with your supplier.
What This DIY Oil-Drop Test Can (and Can’t) Tell You
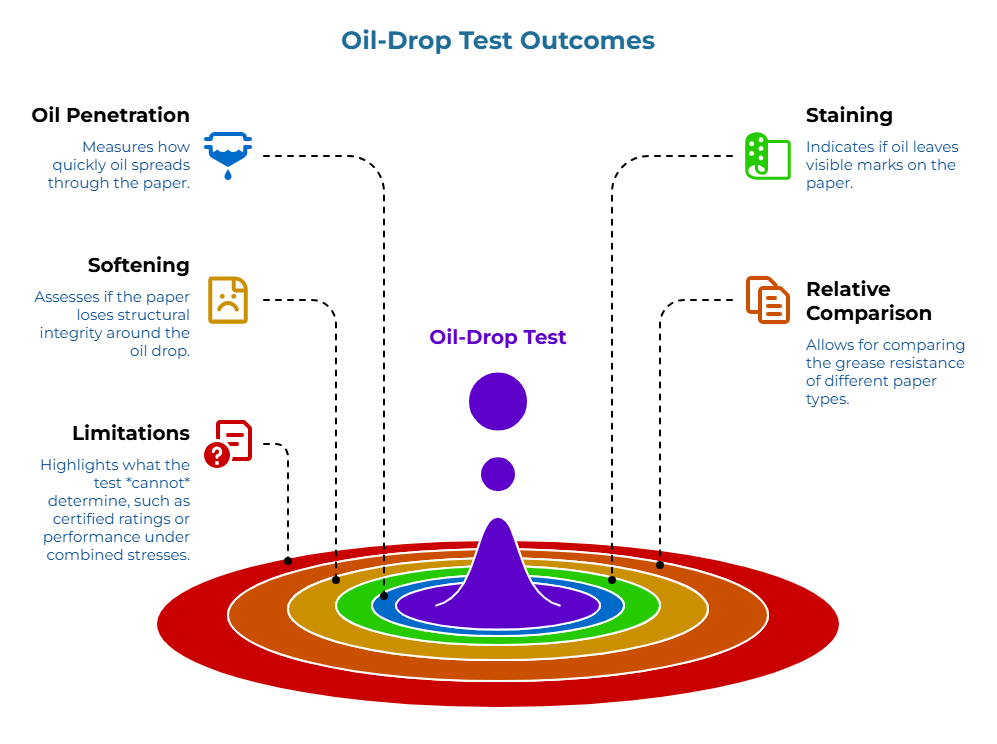
This test answers one practical question: Does this paper resist grease long enough to stay clean and strong during typical holding and handling?
Grease resistance, in practical terms, means paper resists oil wicking, spotting, and softening long enough to do its job. When a wrapper fails, oil migrates through the sheet. The result is translucent spots, exterior staining, or structural weakening that leads to tears and leaks during service.
The oil-drop test is a screening method for comparing how different samples behave when exposed to oil under controlled conditions. It helps reduce the risk of choosing paper that leaks, stains, or softens during service—but it does not provide a certified rating.
What this test reveals:
- Whether one sample resists oil penetration better or worse than another
- How quickly oil spreads across the surface (wicking behavior)
- Whether oil reaches the underside of the sheet within a relevant time window
- Whether the sheet softens around the drop, even without full penetration
- Relative differences between coated papers, uncoated papers, and materials like wax paper
What this test cannot determine:
- The exact grease resistance rating (Kit Level) a paper would receive in standardized laboratory testing
- Performance under simultaneous heat, moisture, and mechanical stress
- Whether the sample matches the production material that will actually ship
This distinction matters for food safety managers and procurement specialists alike. Food contact compliance documentation confirms a paper meets regulatory requirements for contact with food—but as explained in our guide on why ‘food safe’ isn’t enough, that documentation does not automatically guarantee the grease resistance performance needed for a specific application. A paper can be fully compliant and still fail as a burger wrapper if the food packaging paper specifications don’t match the menu’s grease load.
Use the oil-drop test to screen samples and flag potential problems early. Then use what you learn to have a more informed specification conversation with suppliers.
The Quick Setup: Materials, Sample Prep, and a Clean Test Surface
Consistent setup reduces false results. Before running the test, gather these materials and prepare the workspace.
Materials needed:
- Paper samples (at least two sheets of each type being compared)
- Common cooking oil (vegetable or canola—similar to what contacts the food)
- Clean, flat, non-absorbent surface (glass, laminate, ceramic plate, or a clean baking sheet)
- Timer or clock with seconds
- Pen and labels or masking tape
- Small dropper or pipette (optional, but improves drop-size consistency)
- Recording sheet or notebook
Sample preparation rules:
Flat, unfolded sheets produce reliable results. Creases and folds create weak points where oil penetrates faster, generating false-fail readings that don’t represent the material’s true performance.
Label each sample clearly before testing. Write the supplier name, product code, or description on the edge of each sheet. After oil exposure, samples become difficult to distinguish.
Handle samples by the edges only. Oils from fingers contaminate the test surface and can accelerate penetration, skewing results. For packaging engineers evaluating coating performance, even minor contamination affects the accuracy of comparisons.
Test the correct side. If the paper feels different on each side, run the test on both sides and record which side faced the oil. Some papers have grease-resistant coating on one side only, and testing only the coated side misses real-world exposure patterns where food might contact the uncoated surface.
If samples arrived from different environments—one from a cool warehouse, another from a warm delivery truck—let them acclimate at room temperature for at least 30 minutes before testing. Temperature differences affect oil viscosity and penetration behavior.
Test multiple positions on each sheet. Running the test on at least two different spots per sample accounts for coating inconsistencies that might exist across the sheet surface.
Surface setup:
Place samples on a clean, flat surface where both the top and underside can be observed. A glass surface or light-colored laminate works well because oil migration through the sheet becomes visible from below. The ability to lift samples without disturbing the oil drop is essential for checking underside penetration.
Step-by-Step: How to Run the Oil-Drop Test
Consistency in execution allows valid comparisons across samples and across future batches.
Oil Spot Test Checklist
1. Prepare the workspace
- Wipe test surface clean and dry
- Lay samples flat with labels visible
- Set timer within reach
- Prepare recording sheet with columns: Sample ID | Time | Surface Observation | Underside Observation | Softening
2. Apply the oil drop
- Dispense approximately 0.05 ml to 0.1 ml of oil (one to two standard drops)
- Place one drop in the center of each sample’s test area
- Apply drops to all samples within 30 seconds so timing remains comparable
3. Start timing immediately
- Note the exact start time
- Plan observation intervals: 30 seconds, 2 minutes, 5 minutes, 15 minutes, 30 minutes
4. Record observations at each interval
At each checkpoint, document:
- Surface appearance: Drop sitting on top, spreading into a halo, or fully absorbed
- Halo diameter: If spreading, estimate diameter in centimeters
- Translucency: Whether paper has become see-through at the contact point
- Softening: Whether the sheet feels weaker or more pliable around the drop
- Underside check: Lift sample carefully; note any visible oil, staining, or wet appearance
5. Complete final assessment at 30 minutes
- Record final state of each sample
- Photograph results for documentation or supplier discussions
Sample recording format:
| Sample ID | 30s | 2 min | 5 min | 15 min | 30 min | Underside at 30 min | Softening |
| A – Supplier X | Drop sits | Slight halo | Halo ~1.5 cm | Halo ~2 cm | Absorbed, translucent | Faint spotting | Yes |
| B – Supplier Y | Drop sits | Drop sits | Minimal spread | Drop mostly intact | Slight halo | Clean | No |
| C – Wax paper | Beading | Beading | Slight spread | Moderate halo | Halo ~2 cm | Clean | No |
This side-by-side comparison provides clear documentation for sample qualification decisions and supplier conversations. For a deeper comparison of coating types including wax limitations, see Poly vs. Wax vs. Greaseproof: Choosing the Right Coating.
Optional: Add a Handling-Pressure Check
If two samples look similar after the standard test, add a simple pressure step. Real wraps and bags experience compression from stacking and handling, so this variation reveals weaknesses that flat testing might miss.
After the 2-minute checkpoint, place a clean, flat object (a small plate or cutting board) gently over the drop area for 30 seconds. Remove it, then re-check spreading, translucency, and underside spotting at the next checkpoint. Compare results to the unpressured test to see whether pressure accelerates failure.
How to Interpret Results: Pass, Borderline, or Fail for Your Menu
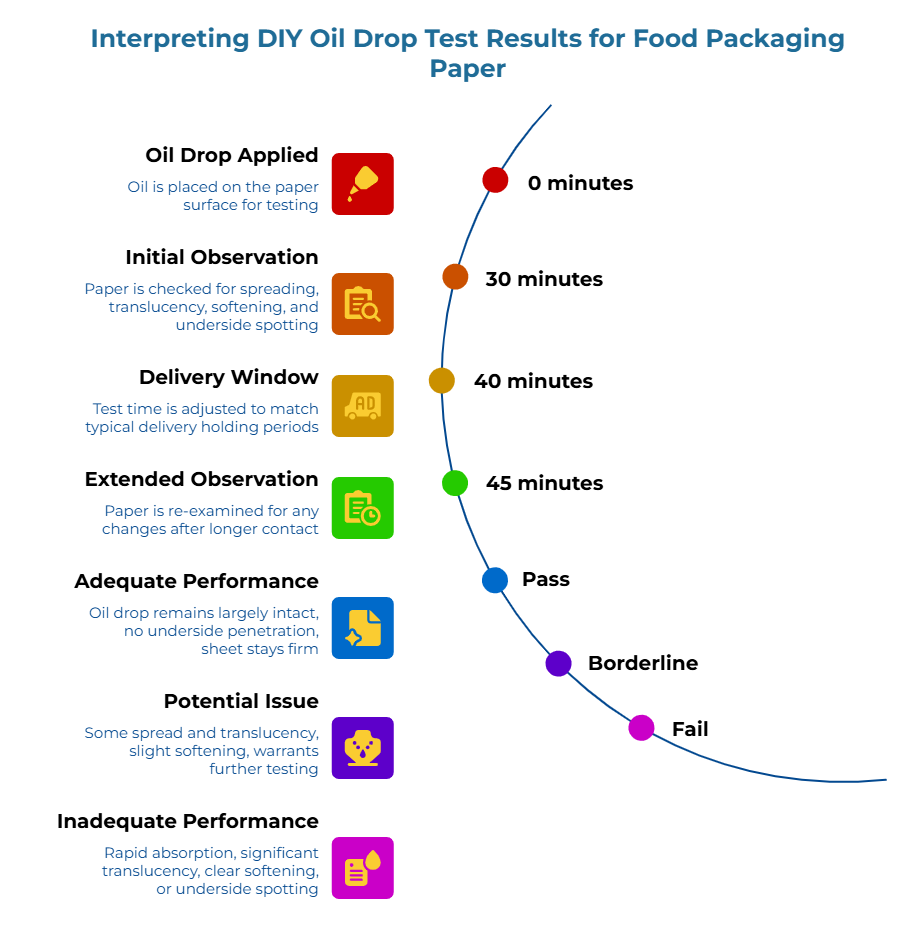
Raw observations require context. A paper showing some oil spread after 30 minutes might be perfectly adequate for a grab-and-go sandwich consumed in 10 minutes—and completely inadequate for a delivery container that sits for 45 minutes in transit.
Consider a food safety manager reviewing samples for a new delivery program. The compliance verification boxes are checked, but the real question is whether the grease barrier holds during a 40-minute delivery window with hot, fatty food. The oil-drop test provides screening data to inform that decision.
What the signals mean:
A spreading halo indicates oil is wicking horizontally across the surface. Faster spread suggests lower grease resistance and potential for visible staining during service.
Translucency—where the paper becomes see-through at the contact point—indicates oil has saturated the sheet. This represents significant barrier breakdown.
Softening around the drop signals that the sheet’s structural integrity is compromised. Even without visible spotting, soft paper tears more easily during handling, increasing the risk of seam blowouts and sloppy wraps.
Underside spotting means oil has migrated completely through the paper. For applications where the exterior must stay clean and dry, this is the clearest failure signal.
Matching results to actual menu conditions:
Three factors determine whether a sample passes or fails for a specific operation, following the same logic used in the Menu-Match Matrix for matching paper to menu conditions:
Contact time defines the relevant test window. A dine-in basket liner might see 15 minutes of food contact. A delivery bag might see 45 minutes or longer—understanding GSM and Kit Levels helps match paper weight and grease resistance to these holding periods. Test results matter only within the window that matches actual use.
Temperature affects grease behavior. Hot food creates different conditions than room-temperature items. Grease becomes more fluid at higher temperatures and penetrates paper faster. For hot, fatty menu items, consider running a variation where paper is warmed slightly before testing.
Pressure compresses packaging and can force oil through barriers that hold up under no-load conditions. A flat sheet test won’t replicate the pressure of three stacked containers, but visible weakness at the screening stage typically amplifies under real load.
Decision framework:
- Pass (for the application): Oil drop remains largely intact or shows minimal spread through the relevant time window. No underside penetration detected. The sheet stays firm.
- Borderline: Some halo spread and minor translucency, but no underside spotting within the time window. Slight softening near the end of the observation period. Warrants additional testing under conditions closer to actual use before specification alignment.
- Fail (for the application): Rapid absorption, significant translucency, clear softening, or underside spotting before food would typically be consumed. This sample is unlikely to perform adequately and should be eliminated from consideration.
The goal is not finding paper that passes every conceivable test. The goal is finding paper that passes for the specific conditions present in the operation.
A short operational example makes the risk clear. A procurement lead approves a “grease resistant” wrapper after a quick feel test. Two weeks later, store teams start double-wrapping fried items to avoid messy handoffs. The paper cost goes up, service slows down, and the brand still gets complaints. A basic oil-drop comparison would have flagged the wicking behavior before rollout.
Common Pitfalls That Create False Passes (or False Fails)
Inconsistent testing produces unreliable comparisons. R&D teams conducting formulation validation and procurement specialists running supplier verification both need accurate results. Watch for these common errors.
Pitfalls causing false passes (paper appears better than actual performance):
Too little oil fails to stress the barrier adequately. A tiny drop may not reveal weaknesses that emerge under real grease loads. Maintain consistent, adequate volume across all tests.
Testing only the coated side misses real-world exposure patterns. Some papers have grease-resistant coating on one side only, as detailed in our comparison of poly-coated vs. uncoated barriers. If the application exposes the uncoated side to food, results will not predict actual performance.
Stopping observation too early misses time-dependent failures. Ending at 5 minutes when food sits in packaging for 30 minutes overlooks the failure that would occur during actual service.
The test surface absorbs oil. Porous surfaces like cardboard, tissue, or wood can pull oil away from the sample, making weak paper look better than it actually is. Use non-absorbent surfaces only.
Pitfalls causing false fails (paper appears worse than actual performance):
Contaminated samples show accelerated penetration. Fingerprints, dust, or handling residue disrupts the surface and creates artificial weak points.
Creased or damaged sheets fail at fold lines regardless of actual material quality. These results do not represent true substrate performance.
Excessive oil volume overwhelms even high-quality barriers. Keep drop size consistent and reasonable—approximately 0.1 ml per test point.
Different oil types produce inconsistent results. Oils behave differently based on viscosity and composition. Keep the oil type constant across all comparisons.
Environmental factors to record:
Note approximate room temperature and humidity at the time of testing. If one sample is tested in cool morning conditions and another during warm afternoon hours, differences in results might reflect the environment rather than the paper.
Quick fix for close results: If two samples appear similar, repeat the test on fresh sheets. A simple repeat often reveals which material is consistently better.
Next Step After the DIY Check: How to Talk to Suppliers Using Specifications
The oil-drop test identifies which samples warrant further investigation. The next step is translating observations into a specification conversation—moving from screening to formal requirements.
Grease resistance standards, commonly expressed as Kit Levels 1–12, provide a formal way to specify and compare grease resistance beyond quick screening. The Kit Test rates grease barrier performance on a standardized scale where higher numbers indicate greater resistance. When requesting a specific Kit Level from a supplier, the requirement references paper tested against a standardized test method rather than a marketing claim.
For those seeking the technical standards themselves, the commonly used Kit Test method is described in TAPPI T 559. The ISO 16532 series (Parts 1–3) also describes several grease resistance determination approaches for paper and board, including permeability, surface repellency, and turpentine tests. Additionally, while older material specifications may still reference the now-withdrawn ASTM D722, modern alternative testing methods generally include TAPPI T 454 for turpentine penetration or ASTM F119 for the rate of grease penetration in flexible barrier materials. These references give a shared language for “grease resistance” beyond marketing labels and make it easier to compare suppliers because the test method and conditions can be named explicitly.
Questions that improve specification alignment:
“What is the rated Kit Level for this paper, and what test method was used?” This establishes whether the supplier has formal performance testing data. Inability to answer indicates a data gap worth noting in supplier verification documentation.
“Does the sample tested match the material that would ship in production orders?” Samples sometimes differ from production runs—a key concern when reading supplier technical data sheets. Confirming specification continuity prevents surprises after commitment.
“What is the test configuration—single sheet or specific layering?” A Kit Level tested on multiple layers may not predict single-sheet performance in actual use.
“What were the test conditions (time, temperature, any creasing)?” Conditions affect results. Knowing the test parameters helps assess whether the rating applies to your application.
“What are the acceptance criteria for incoming material?” This reveals whether the supplier tests incoming stock or relies solely on mill certificates—an important distinction for understanding how test reports translate to real-world expectations.
Translating screening observations into requirements:
If Sample A showed underside spotting at 15 minutes while Sample B stayed clean through 30 minutes, those observations become specification language: “Paper must show no underside oil penetration after 30 minutes of contact with high-fat prepared foods at serving temperature.”
That requirement is actionable. “We need greaseproof paper” is not.
Screen Samples Fast, Then Lock Specifications for Consistency
The oil-drop test is a screening tool, not a final verdict. It compares samples quickly, flags potential problems before production commitments, and generates better questions for supplier evaluation.
The pattern for hands-on operators who verify before committing is straightforward: screen first, then specify. A sample failing the DIY test will almost certainly fail in service. A sample passing deserves closer examination of formal specifications—Kit Levels, test methods, and supplier verification processes—to confirm repeatable performance across orders.
Remember the translucent wrapper from the lunch rush. That failure started with a sample that looked fine but was never tested against actual service conditions. Running a simple, repeatable oil-drop test today changes the dynamic from hoping paper performs to knowing what questions to ask.
That shift—from trusting labels to verifying performance—separates operations surprised by grease stains from operations that specify requirements and receive consistent results.
Screen first. Specify second. Surprise never.
Integrating these DIY observations into formal procurement allows for more rigorous specification of Kit Levels during supplier verification, catching compliance drift before audits do.
Oil Spot Test Checklist (Copy/Paste Reference)
Purpose: Screen paper samples quickly for grease wicking, spotting, and softening risk.
Materials: Paper samples (A/B/C), one cooking oil, timer, marker, clean non-absorbent surface.
Setup rules:
- Label samples
- Keep sheets flat
- Handle by edges
- Test the correct side (or test both sides and note it)
- Keep oil type and timing consistent
Timed observation steps:
- Place one consistent drop on each sample and start the timer.
- Check at 30 seconds, 2 minutes, 5 minutes, 15 minutes, and 30 minutes (adjust to match typical holding time).
- At each checkpoint, record: halo growth, translucency, underside spotting, and any softening.
- If results are close, repeat on fresh sheets.
Simple pass/flag decision guide:
- Pass: Minimal halo growth, no underside spotting in the required time window, sheet stays firm.
- Flag (borderline): Slow spread, late translucency, faint underside spotting near the end of the window, slight softening.
- Fail: Fast spread, early translucency, underside spotting within the window, or clear softening.
Disclaimer:
This article provides educational guidance on screening methods for comparing paper samples. The DIY oil-drop test described is not a replacement for standardized laboratory testing such as TAPPI T 559 (Kit Test). Always verify that packaging materials meet applicable food contact regulations for the relevant jurisdiction.
Our Editorial Process:
Our expert team uses AI tools to help organize and structure our initial drafts. Every piece is then extensively rewritten, fact-checked, and enriched with first-hand insights and experiences by expert humans on our Insights Team to ensure accuracy and clarity.
About the PaperIndex Insights Team:
The PaperIndex Insights Team is our dedicated engine for synthesizing complex topics into clear, helpful guides. While our content is thoroughly reviewed for clarity and accuracy, it is for informational purposes and should not replace professional advice.